Top 10 CSGO Best Aim Training Maps For 2021
Need to improve your aim? check out these CSGO best aim training maps to improve your aim FAST in 2021.
Aiming is not an easy skill, that is why one third of the CSGO player base is ranked in silver. Players that have great aim will naturally climb the ranking system whether it is in Matchmaking or FACEIT.
The good news is, aiming is a skill that can be trained.
To train your aim effectively in CSGO, it is best to use these best aim training maps.
Every professional CSGO player uses aim training maps to train their aim daily and warmup before official matches against other pros.
Aim training maps are a staple for any player looking to improve their mechanical skills. This CSGO aim training maps list is not only a list of maps, but a comprehensive and in depth overview of each map from personal experience.
On Aim_botz alone, I have played 2000 hours, for the other maps I have also played extensive hours on each, whilst trying to improve every aspect of my aim possible.
This list is compiled from years of research, looking at what CSGO aim training maps are best to improve aim the fastest.
I have been playing CSGO for over 5 years and have been training my aim nearly every single day. I know exactly what maps are good for every goal that you want to achieve for your mechanical skills.
Before you begin aim training, make sure you have the correct peripherals such as a good mouse, check if you have a good mouse here.
Are you ready to improve your aim?
Here are the absolute best aim training maps that exist on the steam workshop for 2021 and beyond.
Aim training maps in CSGO are the best way to train your aim.
When you just play FACEIT pugs or matchmaking games , you are only really training your aim for the amount of kills that you get that game. Most of the time that can be anywhere from 5-30.
However, if you train your aim on training maps, you can easily train 1000 kills on bots in 20 minutes.
Bots are not as good to train on as real players, but if you train against moving and strafing bots, it is very nearly the same.
Also combining aim training maps against bots with deathmatch sessions afterwards, will give you a diverse range of aim practice against bots and real players.
To improve your aim significantly, it will require a lot of consistency and volume. If you train your aim everyday for 30 minutes before you play CSGO games, then you will see a big improvement of your aim as long as you are training the most used aspects of your aim.
These aspects include: Target switching, Tracking, Flicking, micro adjusting and the most used weapons such as: AK-47, M4a4/M4a1-s, USP, Deagle and AWP.
For example: If you are an AWPer, it is better to train 50% or more of your time on the AWP. You can practice flicking in aim training maps and practice tracking or aim adjustments in deathmatch.
There are great CSGO best aim training maps for every part of your aim that you want to practice.
If your aim is still not improving, I suggest you check out my article on how to fix that here.
Now read below to find every CSGO best aim training maps for you.
How To Download CSGO Training Maps
Make sure CSGO is closed.
Click on the download button under the map in this article OR open Steam -> click community-> click workshop -> use the search bar to find Counter-Strike -> use the search bar in the top right hand corner to find the map.
Press subscribe if you are inside the map workshop page OR Hover over the map and press the green + symbol
Open CSGO
Click Play -> Click the drop down on the top left and select workshop maps
Select the aim training map and go -> press custom or training
CSGO Best Aim Training Maps For Warmup
Map Name: Aim_Botz
Download here
Alternative Download: Go to Community -> Workshop -> Search Counter Strike -> Search Aim_botz -> press subscribe
Map Creator: Ulletical
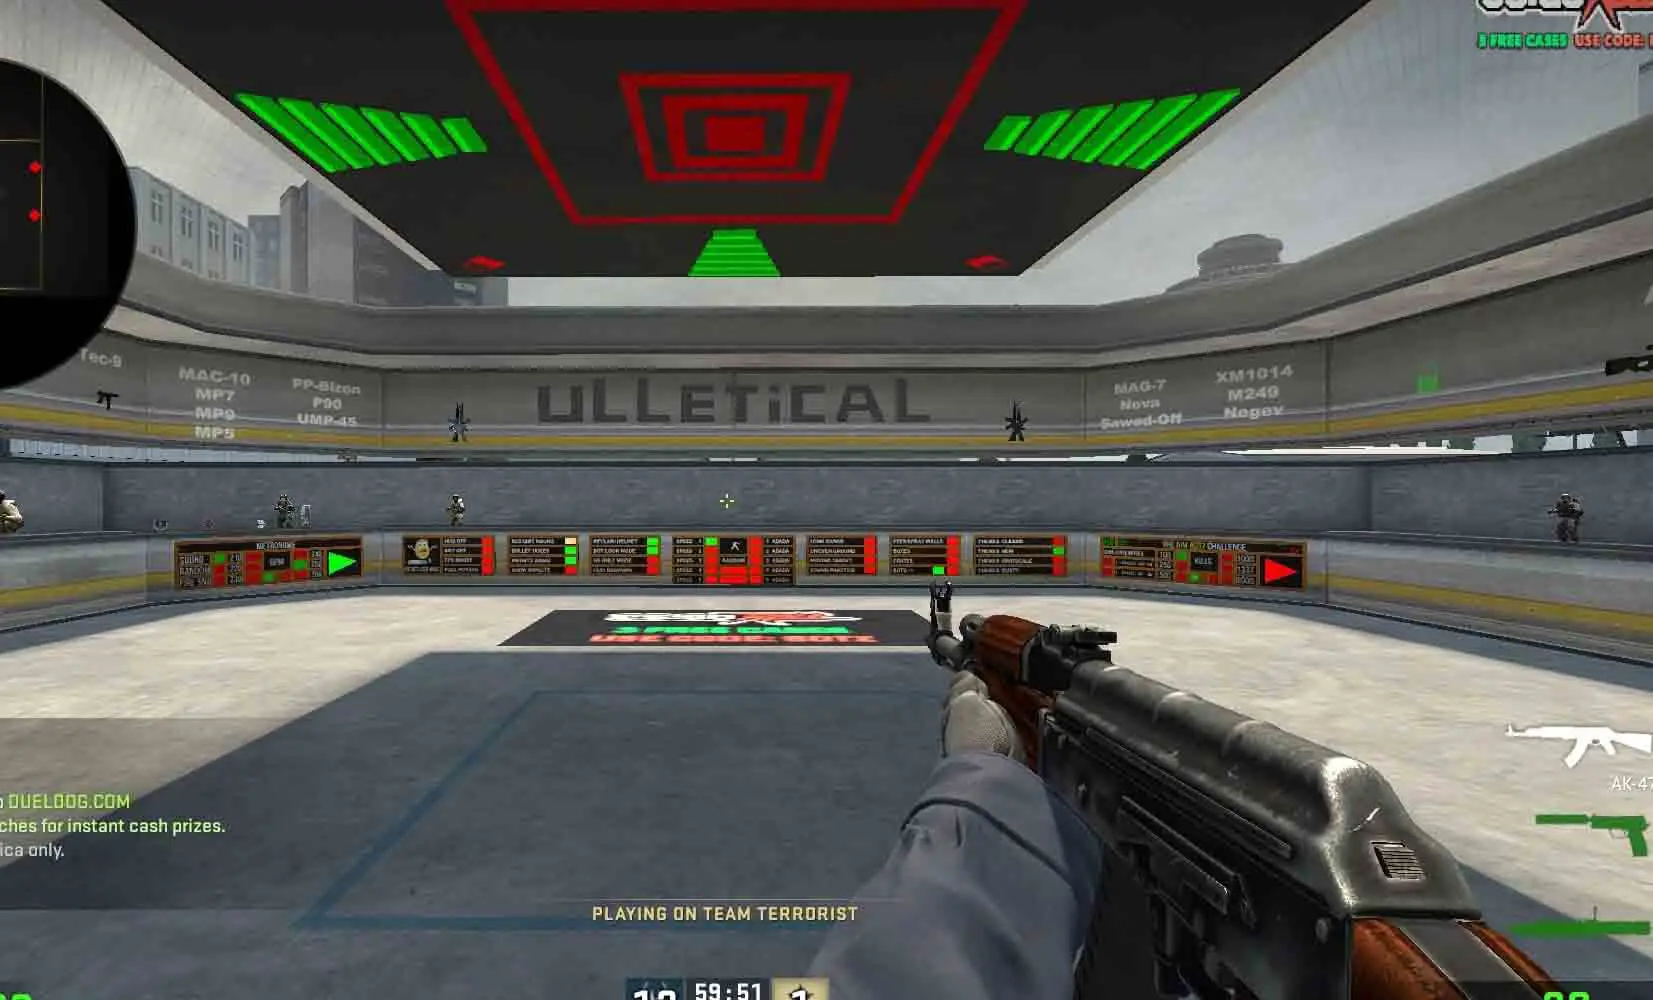
Aim_botz is CSGO’s most popular aim training map, it’s an arena with 360 degrees of shooting range, for you to practice against bots.
Aim_botz is one of the first aim training maps in CSGO and has since been picked up by nearly every single professional player.
This map is great for warming up your aim, because you can instantly hop right in and start training.
You only need to use this map for about 15 minutes before you feel warmed up and ready.
This map is really simple, at the front you have a wall of options, shoot or press E on each of the colored boxes to enable or disable them.
On the wall there are options, each one you can enable or disable:
Hud, change sky, FPS boost, potato mode FPS boost
Restart round, bullet holes, infinite ammo, show bullet impacts, kevlar helmet or kevlar only, headshot only, fast respawn
Bot Speed 1-5, Bot strafing pattern 1-5, random bot movement options
Long range, uneven ground, moving target, sound practice
Peek and spray walls, boxes, crates, bots add or remove
Themes: classic, new, dusty or grayscale
Aim Botz Challenge: 1-100 kills 360 degrees KH or 2-100 kills 90 degrees NA. 100, 250, 500, 1000, 1337 or 2000 kill limit and screenshot option.
The main settings you will use are uneven ground, kevlar helmet or kevlar only, fast respawn, bot speed and strafing 1-5 and the Aim_Botz challenge.
Many people don’t even touch the options, so that is fine too. Around the ceiling there are all the weapons in the game, ranging from the revolver, cz-75 auto to the ak and m4.
You can also change the range and how many quadrants you want open.
The best way I suggest to use Aim_Botz for rifle warm up is to:
Disable 3/4 segments on the roof of the arena
Stand close to the railing of the open segment and proceed to shoot 500 static bots
Focus on switching between targets fast and precisely
Mix up between bursting 2 bullets and tapping 1 bullet per target’s head
In this training map you can change many settings. The bot strafing pattern and strafing speed is customizable, as well as the degree of shooting range you want to enable/disable.
There are options to add boxes and wooden targets, you can also add cover inside the arena to practice peeking out and shooting or pre aiming.
This map is specifically good for warming up because the arena is 360 degrees around you, this allows you to practice aim in every direction.
CSGO best aim training maps are no joke and this one has been used by millions of users.
Personally I have improved my AWP flicks greatly by playing on this map and flicking to bots. Aim_botz is great for warming up the AWP, because flicking is the best way to warm up your AWP aim.
The reason for this, is because good AWP aim comes from readjusting your scope crosshair onto a target, not holding an angle and timing clicking.
Therefore if you practice flicks in every direction in your scope and mix up the length of your flicks, you would have practiced all your AWP readjusting aim.
CSGO Best Training Maps For Target Switching
Map Name: Yprac Bot Arena
Download here
Alternative Download: Go to Community -> Workshop -> Search Counter Strike -> Search Yprac Bot Arena -> press subscribe
Map Creator: Yesber
Yprac Bot Arena is one of the newest maps on the Steam workshop and also has some of the most features.
This map is the best training map on CSGO to improve your aim by far. I have used this for around 50 hours and it has improved my aim already.
Yesber has made a really nice design, the arena is like a gym facility, instead of a boring custom map with bland textures.
There is a big circle in the middle, which you jump onto to begin training, this will open up the quadrants with your current settings and spawn in bots for you to shoot.
These bots begin static but as I will explain, there are many options to choose from.
This is one of the CSGO best aim training maps for pure target switching, it can be used to improve tracking and flicking too.
I highly recommend this training map to any slightly experienced player who wants to improve their aim.
If you are a beginner though, I suggest you use Aim_Botz first. That map is a lot more basic and easier to understand, once you get proficient on that map for about a week or two, then you should jump over to the Yprac Bot Arena.
When you spawn in you will see a lot of panels around you in 360 degrees.
Some of these panels have different weapons to choose from such as pistols, rifles and the AWP, others show the distance of how far the bots can spawn away from you.
There are also options to increase or decrease bots, change elevation of bots, change the bot look direction (great to practice shooting the back of bot’s heads), change the player model of the bots (great to simulate real games) and you can also change how many quadrants of the arena you want enabled.
On the wall there is a panel that shows the kill limit, this is customizable and I like to change to 1000 or no kill limit.
You can also change the time limit.
There are 12 activities to choose from:
Close rush, far rush, spray rush or reflex rush
Close reflex, far reflex, random reflex or uneven reflex
Close 270, rush 360, uneven 270, headshot 360
As you can see, there are many premade activities for you to choose from, this is very similar to a third party aim trainer.
The best thing is that this is within CSGO and everything you practice with your aim will directly translate into your matches or pugs.
The map is great for practicing target switching which is one of the most fundamental aiming skills you need if you want to improve your mechanics.
Target switching is the foundation of aiming, it basically means your ability to readjust your crosshair onto a target precisely after your crosshair was away from the target.
People with good target switching aim can take down multiple opponents within split seconds. It is important to practice target switching in every plane, the X and Y axis.
This allows for realistic training when you are ambushed by players behind you, above you or in front of you.
This map made by Yesber, is very similar to Aim_Botz where you stand in the center of the arena and shoot bots around you.
Just like in Aim_Botz, you can customize how many degrees bots will spawn around you.
One advantage to use this map over Aim_Botz is that the bots also spawn at different heights. In Aim_botz, the bots all spawn horizontally and you can’t make them spawn at different heights.
If you want godlike aim, you must train your aim in the most realistic scenarios.
This is why I like Yprac Aim Arena for target switching and improving aim over the other csgo best aim training maps.
CSGO Best Reflex Training Maps
Map Name: Fast Aim/Reflex Map – Training [DUST2]
Download here
Alternative Download: Go to Community -> Workshop -> Search Counter Strike -> Search Fast Aim/Reflex Map – Training [DUST2] -> press subscribe
Map Creators: yolokas and croc0dil
Fast aim/reflex map dust 2 is a map where you stand in the center of an arena, much like aim _botz, and practice shooting at bots that spawn in every direction and run towards you.
The purpose of this map is to practice your reflexes while being approached by multiple targets, you can practice shooting players that are running at you from every direction with full velocity.
These bots that run towards you will fall into a pit that surrounds you entirely, so you don’t have to worry about them knifing you in the back if you don’t shoot them in time.
On the ceiling there are a bunch of settings, you can change to any gun in the game or adjust the amount of kevlar on the bots (no kevlar with USP is great to simulate pistol rounds.)
There is an option to put up a boundary that blocks bullets towards the bodies of the bots, so that you can only aim for the head.
If you want to, you can make the bots static and not move. You can also change the speed so the bots are super fast. Either 50%, 100% or 150%.
This is great for advanced training, after training with super speed, you will feel like the normal game is slow and easy to aim.
This is one of the best CSGO aim training maps for reflexes. There is an option to enable sv_showimpacts 1, this will let you see every bullet impact highlighted in red. Great for beginners to see how far they are missing.
To get complete and consistent aim, you must train your aim against static and moving targets. This allows you to practice tracking and target switching on moving and still targets.
If you only practice against static bots, you will have very poor aim in a lot of real game scenarios where your opponent is on the move.
That is where this map comes into play, Fast aim/reflex map Dust 2 is a great map to practice your tracking and moving aim.
Professional players like Xeppa and ScreaM use this map to practice their aim a lot.
Great aimers in CSGO understand that they will be a tier above everyone else that only practice against static bots.
Use this map quickly as much as you can, before everyone else finds out how to train their aim optimally. These pro players know the CSGO best aim training maps before anyone else.
There are many settings on this map, you can change the armor value of the bots (whether they have kevlar, no kevlar or helmet & kevlar), you can change your weapon and much more.
Reflex maps such as this one are great for practicing your deagle or USP. On pistol rounds, if you are a CT, you will be versing a lot of moving opponents because the T side can run and shoot accurately with the glock.
Hence why it is very important to practice your USP tracking skills on this map as much as you can.
Mastering the deagle is extremely tough, anyone can shoot a still target, but where most people fail is hitting the one shot on moving targets.
That is why I practice the deagle on this reflex map as well.
CSGO Best Recoil Training Maps
Map Name: Recoil Master – Spray Training
Download here
Alternative Download: Go to Community -> Workshop -> Search Counter Strike -> Recoil Master – Spray Training – Training [DUST2] -> press subscribe
Map Creators: Ulletical
From the creator of the original Aim_botz map, Ulletical has made a new map called recoil master.
If you want to improve your spray control on the AK-47, the krieg or the M4, I highly suggest you use this course as much as you can everyday. Spray control can separate a good player from a great player in CSGO.
This map allows you to practice recoil, you practice your spray at a target in the center of a wall, there will be a moving green dot as you spray, this is called the ghost crosshair.
All you have to do is follow the ghost crosshair with your own crosshair, think of it like a racing game where you follow the ghostcar.
Recoil is the kickback momentum of the weapon upon firing, when you fire fully automatic rifles like the AK-47, the kickback/recoil will follow a specific pattern that is learnable.
The more you shoot, the higher the bullets go because of the recoil, if you can drag your crosshair down and to the sides accordingly, you can control these bullets to land dead in front of you.
You stand in the circle in the middle of the room, then you aim at the center target and when you start spraying, you simply follow the moving green dot with your crosshair.
This green dot shows you exactly where your crosshair should be to have the perfect spray control.
You can change the color of this dot or disable it, change the bullet time which slows down the whole game to 25% so you can spray easier, use moving target to practice against a strafing target circle and even turn on multiple targets to practice spray transfers.
There is a weapon rack on the wall with every single gun in the game to practice, even ones that don’t have a spray pattern, like the deagle.
To be a good mechanical player, you need to not only master your flicking and target switching, but also your spray control.
If you get into a spray battle with another player who has better recoil control than you, then you lose by default. Avoid this scenario by practicing your recoil on this map.
In addition to practicing recoil on this map, you should practice spraying at moving targets too.
A good way to practice spraying against moving targets is on deathmatch, I recommend you join a 128 tick deathmatch server in the community servers option in game.
WarmupServer is a great deathmatch server that is very popular in nearly every region.
CSGO Best Prefire Training Maps
Map Name: Yprac Practice and Warmup
Download here
Alternative Download: Go to Community -> Workshop -> Search Counter Strike -> Search Yprac Practice and Warmup -> press subscribe
Map Creators: Yesber
Prefiring is the ability to preaim a target and shoot pre-emptively before you see the target.
Although this map is called prefire, it is more so preaim practice. This is because during a real game you don’t want to prefire every single angle and give away your position.
That is why it is much more fundamentally strong to practice preaiming on these maps rather than prefiring.
Preaiming is simply pre-emptively aiming at the opponent’s head, by understanding the common angles players hold and how they will be positioned.
You can preaim targets at different elevations and behind different objects.
Preaiming an angle that is too deep into the site, will expose you to an angle that could potentially kill you.
That is where the importance of using these prefire maps come into play.
Every common angle will have a bot that shoots you in them.
This gives you a great understanding of how to work each area of the map in the correct angle order to avoid being exposed to unnecessary angles.
Angles are the line of sight of a static position that a player can be on.
Scroll down and there will be a list of the maps individually, for you to download. Pick the maps you want to train prefire on, I suggest all the main maps in the active pool.
I also recommend you train mirage and dust 2 the most, as they are the most common maps played in pugs or official games.
The prefire maps take you through every area of the map that you will experience on the T side.
For example on Dust 2 you will have a session where you entry from A long, Short or catwalk, B tunnels etc.
This is the most realistic way to train your aim, using prefire maps. Yprac has made the best prefire maps for every map in the active pool.
Prefire maps are basically where you run through different parts of the map and have to clear out angles one by one, there will be bots at every angle.
This is the perfect way to practice T side preaiming and crosshair placement, which are fundamentals mechanics of the game.
There are 8 prefire maps to choose from:
Dust2
Mirage
Cache
Inferno
Overpass
Train
Nuke
Vertigo
I highly suggest you use prefire maps after you have done your aim training on the other maps, this will combine sharp aim with realistic preaim drills.
I recommend these CSGO best aim training maps for preaim and crosshair placement practice.
Half of your aim is how well you preaim and prefire, so training your preaim skills on these prefire maps are very important to any rifler.
Especially if you are an entry fragger, where you have to enter the bombsite first and clear out all of the unknown angles for your teammates.
You don’t have time to clear each one by one, so you have to clear them all fast and skip some, whilst relying on your reactions and reflexes if there is an opponent there.
The UI on the bottom shows you the % complete after each kill of the area, your position and also the time elapsed.
CSGO Best Flick Training Maps
Map Name: training_aim_csgo2
Download here
Alternative Download: Go to Community -> Workshop -> Search Counter Strike -> Search training_aim_csgo2 -> press subscribe
Map Creators: .kataS and Pizza
This map is great for reactions and flickshots, the way you train your aim on this map, is by shooting the red targets as they appear on the big wall in front of you.
Each target will appear and quickly disappear, so you have to shoot them fast. They will also spawn randomly on the entirety of the wall.
training_aim_csgo2 has over 6 million subscribers on the steam workshop, that proves how useful this map is.
It’s like a built in aim trainer for CSGO.
Since the target dots spawn randomly on the wall and disappear quickly, you are always going to have to flick to the targets. This is why it is great for practicing flicking aim within CSGO.
The map shows how many hits and misses you have made on the dot targets at the top. Try and improve every session.
You can choose different training modes:
Classic (fast aiming)
Angles and sliding
Reflex training
Burst training
Intensive fast aiming
Each one focuses on practicing a different style of aiming. Classic mode and intensive fast aiming are great for practicing flick shots.
There are many settings within the map, such as changing the target size, color and shots to kill.
You can also change all the speed and spawn values of the dot targets that appear.
Training your aim can get repetitive, that’s why there are 4 different levels in this CSGO training map, each level is further away from the target wall, this can change the difficulty of the exercise.
Which CSGO best aim training maps are your favorite so far?
CSGO Best Micro Adjustment Training Maps
Map Name: Training Center 1.5c
Download here
Alternative Download: Go to Community -> Workshop -> Search Counter Strike -> Search Training Center 1.5c -> press subscribe
Map Creator: Zool
Micro adjustment in CSGO means your ability to make small fine re adjustments onto a target.
The most obvious time this happens is in pistol rounds, where your opponent is ADAD spamming and you are trying to do small micro flicks to hit their head.
This is what micro adjusting is and it is actually a skill that can be trained, and if you do train it, you will become a pistol master.
There are many different sections on this map. 2 of them are bot arena type maps, the other is an AWP practice range for Dust 2 mid doors.
The two bot arenas are great, because the bots are moving and strafing.
This is why it is perfect for micro adjustment practice, the bots don’t strafe back and forth, but instead have naturally movement like a player. This makes it the perfect map for micro adjusting practice, especially with pistols.
To practice USP micro adjusting, I recommend shooting the settings icon and then shooting armor to 0 to take off the helmet of the bots.
Then shoot the gun icon and choose the USP.
The map I suggest using, is the one that has the car, a few doors and a lot of boxes, because this is perfect to simulate real game environments.
Here is a quick routine:
Turn off kevlar and choose the USP like shown above
Shoot the middle map at the bottom of the 5 map icons when you spawn in.
Type in console: bot_quota 10 and then bot_zombie 0
Shoot 400 moving bots in the head with the USP.
CSGO Best Tracking Training Maps
Map Name: bot_training_dust
Download here
Alternative Download: Go to Community -> Workshop -> Search Counter Strike -> Search bot_training_dust -> press subscribe
Map Creator: Zim
Join the map as a CT and start shooting bots, The weapons available are AK-47, M4a4, M4a1-s, scout, AWP and every pistol, shoot the yellow button to change if the bots have kevlar or not.
You can also shoot + or – to adjust the number of bots. You spawn in with an M4a4 in hand and a USP for your sidearm.
The map settings will be behind you and all the bots will spawn in front of you and run down the ramps on either side.
During that phase of the bots running down the ramp is when you practice tracking their heads.
When do these CSGO best aim training maps show improvement?
After a few days you will see results and after a month you would have improved your aim greatly.
Bots can also spawn under the ramps and run up the middle of the map towards you, that is a great feature that allows for you to train your tracking aim in all elevations. This map is very simple and that is why I like it.
CSGO Best Crosshair Training Maps
Map Name: crashz’ Crosshair Generator v3
Download here
Alternative Download: Go to Community -> Workshop -> Search Counter Strike -> Search crashz’ Crosshair Generator v3 -> press subscribe
Map Creator: crashz
If you need a good crosshair to start aim training on the other CSGO aim training maps, this is the one to start with.
It has nearly every single pro player’s crosshair from over 20 teams.
The map creator keeps the map and all the crosshairs as up to date as he can. There is even a list of old pro crosshairs if you want to go back in time and find one that you liked before.
This map has over 100 different crosshairs to choose from and you just simply shoot the crosshair image on the wall and it will apply it to your game.
When you are done choosing a crosshair, find the button on the wall that says share crosshair.
When you shoot this, it will open your console and show you all the commands for that crosshair.
You can copy paste this code into your autoexec or config if you have one, if you don’t, then you don’t have to do anything and it should be applied forever.
This crosshair map helps you to start on the other CSGO best aim training maps.
If you have the default crosshair, I suggest you use this map to find a better one.
A good crosshair helps you aim, because it has good visibility compared to the default one.
But, it is okay to use the default one to understand when you are moving and when you are static, this helps practice counter strafing into shooting.
What if I don’t like the crosshairs on the wall?
You can create your own custom crosshairs as well, just look on the wall that has the image of Dust 2 A site.
Above it you can choose between all 5 crosshair styles, different styles have different animations or shapes.
For example style 4 is static while style 1 moves and changes when you move around. Underneath the styles you can also change the crosshair color, you have 5 to choose from:
Green
Yellow
Cyan
Blue
Red
If you want a different color like a purple crosshair for example, then you find a purple pro crosshair and then you can alter the other values, apart from the color, in the console.
Now you have chosen a crosshair, you can head through the doorway and test it on 6 different bots, each with a different player model. They strafe back and forth in front of a picture of Dust 2 A site.
There is a purpose for this. It’s because, choosing a good crosshair means it should be visible in all scenarios, this is a good place to test the crosshair’s visibility.
CSGO Best Grenade Training Maps
Map Name: Training maps (Smoke, Molotov, Flash) by Dolnma
Download here
Alternative Download: Go to Community -> Workshop -> Search Counter Strike -> Search Training maps (Smoke, Molotov, Flash) by Dolnma -> press subscribe
Map Creator: Dolnma
Want to learn grenade lineups?
This is the perfect map to practice every grenade lineup, whether it is smoke, flash or molly.
Utility usage (grenade usage) are extremely important to win in CSGO.
Take for example Astralis, the best CSGO team of all time that has won over 4 majors.
Most of their success is from their teamwork and utility usage. They have shifted the CSGO meta by simply using utility differently.
Why is utility so powerful?
When you have 2 teams stacked up against eachother, each team has talented players and they are all on the same skill level, how do you get an edge over the other team? Utility and teamwork.
A team that throws flashbangs for each other, will beat a team that throw flashbangs only for themselves.
It is like not passing the ball in football/soccer if you don’t throw flashes for your teammates.
Your teammate can throw a flashbang for you when you call it at the perfect time, the flash will be a pop flash if your teammate knows his grenade lineups.
Meaning the other team will not be able to turn from it and all be blind.
This is how highlights are made, by using teammates flashes to peek out when the enemy is vulnerable.
The way you do this is by waiting behind cover and either calling a flash off a feeling or off a sound queue, when you think the enemy is in the open and susceptible to the flash.
After it pops, you swing out immediately and shoot the unblind targets first.
Smokes are also one of the best pieces of utility aside from the flash, if you can only afford a single grenade with $300, you should buy the smoke. It blocks off enemies for roughly 15-18 seconds and forces them to go through or to wait.
An effective way to use smokes on CT is by holding them until mid round and then start chain smoking important chokepoints.
If you use your smokes at 1:30 for example, the T side will just wait out the duration and hit the site afterwards.
However, if you hold your smokes until the midround and then start chainsmoking, they now have to hit the site and check every angle with only 20 seconds left.
Chainsmoking is just replenishing the smoke grenade, by using teammates to smoke the same spot.
Only chainsmoke important chokepoints that prevent the Ts from taking the bombsite.
Watch any professional game and you will learn which chokepoints to smoke and when. Take into account the scenario, information and pressure of the enemy team as well.
Molotov lineups are most effective during retakes as a CT or site executes as a T. There are 2 powerful ways to use a molotov.
Prevent a rush on CT
Flush out a strong position whether as a CT or T
Rush prevention molotovs as a CT are simple and easy to throw, an example is throwing one down middle on inferno. Another example is by throwing one at A ramp on mirage.
The recent meta during CSGO, is that pro teams will use the majority of their molotovs to prevent rushes instead of holding them.
You can see on Train, some teams will throw a molly into Tcon (mid/Tmain), olof (T quad) and into SL (popdog/ladder) at the beginning of every round.
These utility routines are to prevent rushes and early map control by the T side.
This then allows your team on the defense to setup correctly and begin to take information to alter your setup during the round.
Most often, if you give the T side too much space by not routinely using early round molotovs, they will take up too much map control for free and pincer you until your site hold breaks.
This can clearly be seen by not throwing a molotov from ebox (electric), into SL (popdog/ladder room) at the beginning of the round, that means the T side player with the best SL spawn can run and jump down the ladder and take that control for free.
Losing SL is dangerous, because Tcon (tmain), is T side map control by default because you can’t get there before them.
There are 6 maps to choose from in the Steam Workshop. Choose the ones you want to practice grenades on and download them. After downloading them, launch the training map with the tutorial a the beginning of the article.
When you spawn in, pay attention to this trick to make the map work properly.
All you do is hold Right CTRL on your keyboard and then press 1, 2 or 3. 1 is smoke, 2 is molly and 3 is flash.
Now, stand in one of the red circles, this is the starting position for the grenade lineup.
On the ground is a green dot, this is the pixel you should crouch and place your crosshair directly over, while looking straight down.
Look up and follow the instructions on the UI panel that pops up. It explains where to stand, where to aim and where the smoke lands.
Take note that some of these maps are older versions.
Utility usage is very detailed and important, don’t just use the CSGO best aim training maps, also use the best utility training maps too. This will make you a complete player.
Conclusion
We all know the second piece to the puzzle of good aim is to have good peripherals, if you need help choosing the right ones, check out my gear list, which I have perfected over 7 years of playing CSGO.
These were the CSGO best training maps of 2021 and beyond.
CSGO has always been about skill, whether it is preaiming, prefiring, crosshair placement, angles, target switching, flicking, tracking or just pure headshots.
Use these maps if you want to climb out of elo hell and reach high ranks like level 10 in FACEIT. I use these on a regular basis and have hundreds of hours on different ones.
Download them by clicking the download link and pressing subscribe under the map, then follow my quick tutorial on how to install and play the maps.
Enjoy training